Install VS extension - Bicep
AZ powershell - set exec policy unrestricted
Install-module az allowclobber -scope currentuser
Bicep structure and concepts
- parameters (param)
- variables (var)
- resource declarations
- existing resources
- parent/child resource relationship
- modules/ reusable
- dependencies
- outputs
- loops
- conditions
- scope
Deploying Bicep code
sqlConnect-azaccount
Get-azsubscription
Set-azcontext -subscriptionid xxxxx
Get-azcontext
New-azsubscriptiondeployment or new-azmanagementgroupdeployment
New-azresourcegroupdeployment -name Rgtest -resourcegroupname decomrg -templatefile c:\path\main.bicep
Training resources
- Build your first Bicep template - Training | Microsoft Learn
- Create virtual network resources by using Bicep - Azure Resource Manager | Microsoft Learn
Variables
javascriptvar storageAccountSkuName = (environmentType == 'prod') ? 'Standard_GRS' : 'Standard_LRS'
var appServicePlanSkuName = (environmentType == 'prod') ? 'P2V3' : 'F1'
Installing Bicep
choco install bicep
pythonwinget install -e --id Microsoft.Bicep
Installing Bicep CLI
bash# Create the install folder
$installPath = "$env:USERPROFILE\.bicep"
$installDir = New-Item -ItemType Directory -Path $installPath -Force
$installDir.Attributes += 'Hidden'
# Fetch the latest Bicep CLI binary
(New-Object Net.WebClient).DownloadFile("https://github.com/Azure/bicep/releases/latest/download/bicep-win-x64.exe", "$installPath\bicep.exe")
# Add bicep to your PATH
$currentPath = (Get-Item -path "HKCU:\Environment" ).GetValue('Path', '', 'DoNotExpandEnvironmentNames')
if (-not $currentPath.Contains("%USERPROFILE%\.bicep")) { setx PATH ($currentPath + ";%USERPROFILE%\.bicep") }
if (-not $env:path.Contains($installPath)) { $env:path += ";$installPath" }
# Verify you can now access the 'bicep' command.
bicep --help
# Done!
Azure Architecture Center
Tips & Tricks
- Front door is considered a difficult resource to create in Bicep
- Create an Azure resource group using the New-AzResourceGroup command.
Bicep Build and Deployment
The following steps are required to build and deploy the module:
sqlNew-AzResourceGroup -Name 'Bicep-modules-01' -Location 'westus' -Force
- Define the deployment parameters in a hash table.
makefile@Parameters = @{
Name ='"ainDeployment" + (get-date).ToString("yyyyMMddHHmmss")
TemplateFile = '01 Use modules.bicep'
ResourceGroupName = 'Bicep-Modules-01'
appServiceAppName = 'bicepmodulExample'
}
- Deploy the resources using the New-ResourceGroupDeployment command.
sqlNew-ResourceGroupDeployment @Parameters -verbose
It's also important to follow a naming convention for Azure services. You can find more information on this topic at the following links:
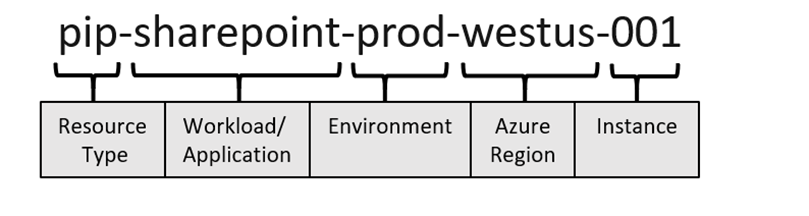
Azure Service Abbreviations
Microsoft's Bicep project offers a naming convention open-source tool that can be deployed in different ways, such as a container or web app on a basic tier SKU, or hosted as a docker image locally. Please refer to the GitHub repository with Creative Commons Attribution to deploy the tool for personal reference while planning naming convention for different resources in Azure as there are bunch of resources in Azure with text length and text type limitations. I have deployed https://github.com/pchettri3/AZNamingCAF as web apps using GitHub action and GitHub pipeline. AS recommended in the Grepo. I had to create SP with secrets like AZUREAPPSERVICE_PUBLISHPROFILE, Azure Credentials, Azure_webapp_name and published profile to successfully complete the deployment on web app.
The following example skips the specified number of elements in the array, and the
specified number of characters in a string.
Param
testArray array = [
'one'
'two'
'three'
]
param
elementsToSkip int = 2
param
testString string = 'one two three'
param
charactersToSkip int = 4
output
arrayOutput array = skip(testArray, elementsToSkip)
output
stringOutput string = skip(testString, charactersToSkip)
SPLIT
param
firstString string = 'one,two,three'
param
secondString string = 'one;two,three'
var
delimiters = [
','
';'
]
output
firstOutput array = split(firstString, ',')
output
secondOutput array = split(secondString, delimiters)
https://aka.ms/learnlive-2022405A
Object


Decorators


Good idea to have a parameter json file for each environment


Override
with parameter file

Az deployment group create --template-file main. Bicep
--parameter parameters.json appservicePlanInstanceCount = 5 (highest priority
overwriting at deployment)
@secure
decorator if you really need to use secrets directly
Avoid using parameters file for secrets and output for secrets
Integrate with KV and can be used in parameter file if used with KV


--enabled-for-template-deployment
for Keyvault secret


The Bicep language also provides features such as split and skip for manipulating arrays and strings. You can find more information on this topic at the following link: Azure Learn Live 2022405A
It's a good idea to have a parameter JSON file for each environment, which can be used to override values in the main deployment file. To deploy the module using a parameter file, you can use the following command:
sqlAz deployment group create --template-file main.bicep --parameter parameters.json appservicePlanInstanceCount = 5 (highest priority overwriting at deployment)
Note that it's recommended to use the @secure decorator if you need to use secrets directly in your Bicep code. It's also important to avoid using parameters files for secrets and outputs for secrets. Instead, you can integrate with Azure Key Vault and use it in your parameter file if needed.
Deploying Azure Resources with Bicep
Deploying Keyvault secrets
To deploy Keyvault secrets with --enabled-for-template-deployment flag, use the following command:
cssaz keyvault secret set --vault-name <vault_name> --name <secret_name> --value <secret_value> --enabled-for-template-deployment
Deploying Azure Resources with Bicep
We will use the following variables in the deployment script:
makefileresourceGroupName=$(az group list --query "[].{name:name}" --output tsv)
deploymentName="parameterfiledeployment"
templateFile="webApp.bicep"
templateParameterFile="webApp.parameters.json"
We will also use the following environment configuration map to configure the deployment:
cssvar environmentConfigurationMap = {
Production: {
appServicePlan: {
sku: {
name: 'P2V3'
capacity: 3
}
}
storageAccount: {
sku: {
name: 'ZRS'
}
}
}
Test: {
appServicePlan: {
sku: {
name: 'S2'
capacity: 1
}
}
storageAccount: {
sku: {
name: 'LRS'
}
vnet : {
name: replace(names.outputs.resourceNameShort, '[PC]', 'vnetp')
addressPrefix: '10.0.0.0/20'
snet : {
[for i in range(1, number): { name: 'subnet-${i}' properties: { addressPrefix: '10.0.${i}.0/24' } }]
}
}
}
}
}
To connect to Azure, use the following commands:
sqlConnect-AzAccount
$context = Get-AzSubscription -SubscriptionId 0bc16f10-xxxxxx Set-AzContext $context
Set-AzDefault -ResourceGroupName learn-635-a627-2cfd3xxxxxxIf you encounter the error New-AzResourceGroupDeployment: Cannot retrieve the dynamic parameters for the cmdlet. Cannot find path ‘.json’ because it does not exist, you can fix it by installing the vscode package with chocolatey by running the following commands:
sqlSet-ExecutionPolicy Bypass -Scope Process -Force; iex ((New-Object System.Net.WebClient).DownloadString('https://chocolatey.org/install.ps1'))
choco install vscode
Deploying Resources Conditionally with Bicep
We can deploy resources conditionally using Bicep. You can refer to the article [Use Bicep to deploy your Azure infrastructure as code Ep4: Build flexible Bicep templates by using conditions and loops](https://docs
Deploy to Azure using PowerShell Module with Splatting
To deploy resources to Azure using the PowerShell module, you can use the New-AzResourceGroupDeployment cmdlet with the @parameters splatting technique. To deploy the environment to production, you can use the following code:
sqlNew-AzResourceGroupDeployment @parameters -environment production -verbose
Deploying Azure Infrastructure as Code using Bicep
You can use Bicep to deploy your Azure infrastructure as code. To build flexible Bicep templates, you can use conditions and loops. The Microsoft Learn course "Use Bicep to deploy your Azure infrastructure as code" has an episode that covers this topic in detail.
Using For Loop in Bicep
In Bicep, you can use the for loop to repeat the same operations multiple times. The range of the loop can start from 0 or any other number.
Using Conditions in Bicep
Conditions can be used in Bicep to make decisions based on certain conditions. For example, you can use a condition to deploy a SQL database only if the environment is production, and not deploy it otherwise.
Controlling Loop Execution with @batchsize
In Bicep, you can control the execution of a loop by using the @batchsize parameter.
Connecting to the Azure Account and Subscription
To deploy resources to Azure using the PowerShell module, you need to connect to your Azure account and subscription. You can do this using the following code:
perl# Connect to the Azure account and subscription
connect-azaccount
# Get Context and set the context for the deployment
$context = get-azsubscription -subscriptionName 'xxxx'
set-azcontext $context
Deploying Resources
Once you are connected to your Azure account and subscription, you can deploy resources using the New-AzResourceGroupDeployment cmdlet. You can use splatting to assign the parameters for the deployment, as shown in the following code:
sql# Create the main resource group if needed
## New-AzResourceGroup -name 'rrr' -location 'location' -force
# Splat expression to assign parameters for deployment
$Parameters = @{
Name = "deploymentName"+ (get-date).ToString("yyyyMMddHHmmss")
TemplateFile = 'Name of the main templaete file'
TemplateParameterFile = "env specific template parameter file "
}
New-AzResourceGroupDeployment @parameters -verbose
Using Template Specs in Bicep
In Bicep, you can use template specs to publish libraries of reusable infrastructure code. Microsoft Learn has a course on this topic, "Use Bicep to deploy your Azure infrastructure as code".
YAML in Bicep
Bicep supports YAML as a format for writing templates.
Awesome Azure Bicep Resource
There are many great resources available for learning about Azure Bicep. Here are some of the best:
- Awesome Azure Bicep
- [Structure Bicep code for collaboration](https://learn.microsoft.com/en-us/training/modules/structure-bicep-code-collaboration/


Deploy
to Azure powershell module with splatting . Ps1

Information on Azure Naming Tool
Azure Naming Tool is a project developed by Microsoft to help organizations adopt a consistent and standardized naming convention for their Azure resources. The tool generates names for resources based on a set of predefined naming conventions, making it easier to manage and identify resources in large environments.
Overview of the Azure Naming Tool
The Azure Naming Tool is part of the Cloud Adoption Framework for Azure, and it is available as an open-source project on GitHub. The tool is a PowerShell script that generates names for Azure resources based on a set of rules and patterns defined in a JSON file.
CloudAdoptionFramework/ready/AzNamingTool at master · microsoft/CloudAdoptionFramework (github.com)
The tool supports a wide range of resource types, including virtual machines, virtual networks, storage accounts, and more. It also allows for customizations to the naming convention, enabling organizations to adapt the tool to their specific needs.
Parameterized Deployment and Naming Convention
To simplify deployment and management of Azure resources, it is important to use a consistent naming convention. This can be achieved through parameterized deployment, where parameters are defined in a separate file that specifies the values for resource names.
The YouTube video linked in the introduction provides guidance on parameterized deployment and naming convention, showing how to use PowerShell splatting or automate deployment with GitHub action YAML workflow.
Another good example of abstracting module by passing value from parameter is the learn module deployment with GitHub action. This method involves having a different parameter file for each environment, which allows for the deployment of respective resources manually using PowerShell command or splatting to simplify deployment with ps1 file. Alternatively, the workflow can be plugged into the GitHub action to deploy the same parameter source automatically.
Microsoft offers a training module on how to manage multiple environments using Bicep and GitHub actions, which includes a section on handling differences between environments using Bicep parameters. You can access this module at the following link:
Naming Standards
Naming standards are critical to ensuring consistency and ease of management for Azure resources. A good naming standard should be intuitive, easy to remember, and provide enough information to identify the resource's purpose.
The Azure Naming Tool provides a set of predefined naming conventions that organizations can use as a starting point, but it also allows for customization of the naming standard. Two great resources for best practices on Azure naming standards are provided in the links below:
- https://brwilkinson.github.io/AzureDeploymentFramework/Naming_Standards.html
- https://brwilkinson.github.io/AzureDeploymentFramework/Parameter_Files.html
Azure Naming Tool in Action
In the Microsoft Learn Live module linked in the introduction, a demonstration of how to abstract a template with a parameter file is provided. This is an excellent resource to get started with the Azure Naming Tool.
Additionally, the GitHub repository linked below provides a set of advanced deployments using the Azure Naming Tool:
Another great resource for understanding how to create a separate module for naming convention using Bicep is provided in the link below:
Conclusion
The Azure Naming Tool is a powerful tool that can help organizations adopt a standardized naming convention for their Azure resources. With a few simple steps, the tool can generate consistent names for resources, making it easier to manage and identify resources in large environments. Whether you're new to Azure or an experienced user, the Azure Naming Tool is a great resource to have in your toolbox.
Bicep project design workflow -

Starting my git repo after the step 5 of the process -
Updated Bicep Code for Idempotent Deployment of Log Analytics module
To make a Bicep deployment idempotent and fail-free for subsequent deployments, the "dependsOn" property can be used to ensure that resources are created or updated in the correct order, and the "exists" function can be used to check if a resource already exists before attempting to create it.
Here is an updated version of the Bicep code with these changes:
bicepresource pclaw 'Microsoft.OperationalInsights/workspaces@2022-10-01' = if (resourceExists) {properties: {// source: 'Azure'sku: {name: 'pergb2018'}retentionInDays: 30features: {legacy: 0searchVersion: 1enableLogAccessUsingOnlyResourcePermissions: true}workspaceCapping: {dailyQuotaGb: json('-1.0')}publicNetworkAccessForIngestion: 'Enabled'publicNetworkAccessForQuery: 'Enabled'}name: 'laW${namingConvention}'location: location}resource runPowerShellInlineWithOutput 'Microsoft.Resources/deploymentScripts@2020-10-01' = {name: 'runPowerShellInlineWithOutput'location: locationkind: 'AzurePowerShell'identity: {type: 'UserAssigned'userAssignedIdentities: {'${UserAssignedIdentity}': {}}}properties: {forceUpdateTag: utcValueazPowerShellVersion: '9.0'arguments: '-resourceName ${resourceName} -resourceGroupName ${resourceGroupName} -aaLinkedName ${aaLinkedName}'scriptContent: '''param([string] $resourceName,[string] $ResourceGroupName[string] $aaLinkedName)if (Get-AzResource -ResourceName $resourceName -ResourceType 'Microsoft.OperationalInsights/workspaces' -ResourceGroupName $ResourceGroupName -ErrorAction SilentlyContinue | Select-Object -First 1) {# Resource found$ResourceExists = $true}else {# Resource not found$ResourceExists = $falseWrite-Output $ResourceExistsWrite-Output $resourceNameWrite-Host $ResourceExistsWrite-Host $resourceName}if (Get-AzResource -ResourceName $aaLinkedName -ResourceType 'Microsoft.OperationalInsights/workspaces/linkedServices' -ResourceGroupName $ResourceGroupName -ErrorAction SilentlyContinue | Select-Object -First 1) {# Resource found$linkedResourceExists = $true}else {# Resource not found$linkedResourceExists = $false}Write-Output $linkedResourceExistsWrite-Output $aaLinkedName$DeploymentScriptOutputs = @{}$DeploymentScriptOutputs['Result'] = $ResourceExists$DeploymentScriptOutputs['aalResult'] = $linkedResourceExists$DeploymentScriptOutputs['nameOutput'] = $resourceName'''timeout: 'PT1H'cleanupPreference: 'OnSuccess'retentionInterval: 'PT2H'}}
In this updated version of the code, the "pclaw" resource uses the "existing" keyword to check if the workspace already exists before attempting to create it. The "resPcLawSolutions" and "resLawLinkedServiceForAutomationAccount" resources use the "dependsOn" property to ensure that they are created or updated after the "pclaw" resource.
The "exists" property is used to check if the resource already exists before attempting to create it. This ensures that subsequent deployments do not create duplicate resources, and that the deployment is idempotent.
With these changes, the deployment should be idempotent and fail-free for subsequent deployments.
Another good repo I found today in Bicep Landing zone vending module with IPAM -
No comments:
Post a Comment